Delta Plus Kitchen Faucet Leaking: A Comprehensive Guide to Troubleshooting and Repair
A dripping faucet is more than just an annoyance; it’s a drain on your wallet and a waste of precious water resources. If you’re experiencing a Delta Plus kitchen faucet leaking, you’re not alone. Many homeowners face this common plumbing issue. This comprehensive guide will walk you through the troubleshooting process, helping you identify the cause of the leak and providing step-by-step instructions on how to repair it. We’ll cover everything from identifying the type of Delta Plus kitchen faucet you have to replacing worn-out parts. Remember, safety first: always turn off the water supply before attempting any repairs.
Identifying Your Delta Plus Faucet Type
Before you can fix a Delta Plus kitchen faucet leaking, you need to identify the type of faucet you have. Delta Plus offers various models, each with its own unique design and repair requirements. Common types include:
- Compression Faucets: These are older models with separate hot and cold handles. They typically use rubber washers that wear out over time.
- Ball Faucets: Characterized by a single handle that controls both water flow and temperature. They contain a ball valve mechanism.
- Cartridge Faucets: Also feature a single handle but use a cartridge to control water flow. These are known for their smooth operation.
- Ceramic Disc Faucets: The most modern type, using ceramic discs for precise water control. They are generally very durable but can still leak.
Knowing your faucet type is crucial because the parts and repair procedures will differ. Look at the handle and spout design to determine which type you own. A quick search online using the model number (often found on the faucet body or in the original documentation) can also help.
Common Causes of a Delta Plus Kitchen Faucet Leaking
Once you’ve identified your faucet type, the next step is to determine the cause of the Delta Plus kitchen faucet leaking. Several factors can contribute to this problem:
- Worn-Out Washers: In compression faucets, worn or damaged rubber washers are a primary culprit. These washers create a seal, and when they deteriorate, leaks occur.
- O-Ring Issues: O-rings are small rubber rings that create seals around various faucet parts. Over time, they can become brittle and crack, leading to leaks.
- Loose Parts: Vibrations and regular use can loosen nuts, screws, and other components within the faucet.
- Corroded Valve Seats: Valve seats are the part of the faucet body against which the washers press. Corrosion can prevent a tight seal, causing leaks.
- Damaged Cartridge: In cartridge faucets, a damaged or worn cartridge can cause leaks.
- High Water Pressure: Excessively high water pressure can put stress on faucet components, leading to premature wear and leaks.
- Mineral Buildup: Hard water can cause mineral deposits to accumulate inside the faucet, affecting its performance and causing leaks.
Carefully inspect your faucet to identify the most likely cause of the leak. Consider the faucet’s age and how frequently it’s used.
Tools and Materials Needed for Repair
Before you start the repair, gather the necessary tools and materials. Having everything on hand will make the process smoother and more efficient. Here’s a list of common items you’ll need:
- Adjustable Wrench: For loosening and tightening nuts and bolts.
- Screwdrivers: Both Phillips head and flathead screwdrivers.
- Pliers: For gripping and manipulating small parts.
- Allen Wrench Set: Some faucets use Allen screws.
- Basin Wrench (Optional): Useful for reaching nuts in tight spaces under the sink.
- Replacement Parts: Washers, O-rings, cartridges, or other components as needed. Ensure you purchase the correct parts for your specific Delta Plus kitchen faucet model.
- Plumber’s Grease: To lubricate parts and prevent future corrosion.
- White Vinegar: For removing mineral deposits.
- Clean Rags or Sponges: For cleaning and wiping up spills.
- Bucket: To catch any water that may leak during the repair.
- Safety Glasses: To protect your eyes from debris.
Having these tools and materials prepared will save you time and frustration during the repair process.
Step-by-Step Repair Guide for a Leaking Delta Plus Kitchen Faucet
Now, let’s get to the actual repair. The following steps provide a general guide, but specific procedures may vary depending on your faucet type. Always consult your faucet’s manual or search for specific instructions online if needed.
Step 1: Turn Off the Water Supply
Before you do anything else, turn off the water supply to the faucet. Locate the shut-off valves under the sink (usually two separate valves for hot and cold water). Turn both valves clockwise until they are completely closed. If you don’t have shut-off valves under the sink, you’ll need to turn off the main water supply to your house.
Step 2: Protect Your Sink
Place a towel or old cloth in the sink to protect it from scratches and damage while you’re working.
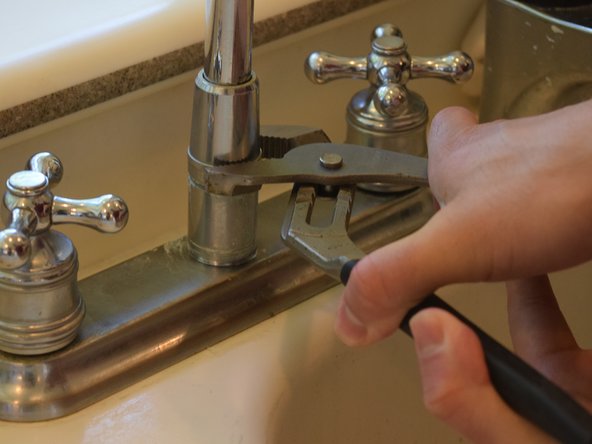
Step 3: Disassemble the Faucet
Carefully disassemble the faucet, taking note of how each part fits together. Depending on your faucet type, you may need to remove the handle, spout, and other components. Refer to your faucet’s diagram or online resources for specific instructions. Keep all the parts organized in a safe place to avoid losing them.
Step 4: Inspect and Replace Worn Parts
Once the faucet is disassembled, inspect all the parts for wear and tear. Pay close attention to washers, O-rings, and the cartridge (if applicable). Replace any damaged or worn parts with new ones. If you’re unsure about which parts to replace, it’s often a good idea to replace all the rubber components, as they tend to degrade over time. Make sure you purchase parts specifically designed for your Delta Plus kitchen faucet model. [See also: Finding the Right Faucet Parts]
Step 5: Clean Mineral Deposits
If you notice mineral buildup inside the faucet, soak the affected parts in white vinegar for a few hours or overnight. This will help dissolve the deposits. Use a soft brush to scrub away any remaining residue. Rinse the parts thoroughly with clean water before reassembling the faucet.
Step 6: Lubricate the Parts
Apply a thin layer of plumber’s grease to the washers, O-rings, and other moving parts. This will help them seal properly and prevent future corrosion.
Step 7: Reassemble the Faucet
Carefully reassemble the faucet, following the reverse order of disassembly. Make sure all the parts are properly aligned and securely tightened. Don’t overtighten the nuts and bolts, as this can damage the faucet.
Step 8: Turn On the Water Supply
Slowly turn on the water supply, starting with a small amount of pressure. Check for leaks around the faucet base, spout, and handles. If you see any leaks, tighten the connections or re-examine the parts to ensure they are properly installed. Gradually increase the water pressure to the normal level.
Step 9: Test the Faucet
Test the faucet by turning it on and off several times, checking for smooth operation and any signs of leaks. Adjust the water temperature to ensure both hot and cold water are working correctly.
Preventing Future Leaks
Once you’ve successfully repaired the Delta Plus kitchen faucet leaking, take steps to prevent future leaks:
- Regular Maintenance: Periodically inspect your faucet for signs of wear and tear. Replace worn parts before they cause leaks.
- Water Softener: If you have hard water, consider installing a water softener to reduce mineral buildup.
- Control Water Pressure: Ensure your water pressure is within the recommended range (typically between 40 and 60 PSI). A pressure regulator can help control high water pressure.
- Proper Installation: When installing a new faucet, follow the manufacturer’s instructions carefully. [See also: Choosing the Right Kitchen Faucet]
- Avoid Abrasive Cleaners: Use mild, non-abrasive cleaners to clean your faucet. Harsh chemicals can damage the finish and seals.
When to Call a Plumber
While many faucet leaks can be repaired with DIY methods, some situations require the expertise of a professional plumber. Consider calling a plumber if:
- You’re not comfortable working with plumbing.
- You can’t identify the cause of the leak.
- You’ve tried to repair the faucet, but the leak persists.
- The faucet is severely damaged or corroded.
- You have complex plumbing issues.
A qualified plumber can diagnose the problem accurately and provide the necessary repairs or replacements.
Conclusion
A Delta Plus kitchen faucet leaking can be a frustrating problem, but with the right knowledge and tools, you can often repair it yourself. By following the steps outlined in this guide, you can identify the cause of the leak, replace worn parts, and restore your faucet to proper working order. Remember to prioritize safety and consult a professional plumber if you’re unsure about any aspect of the repair process. Regular maintenance and preventative measures can help you avoid future leaks and keep your Delta Plus kitchen faucet functioning smoothly for years to come. Addressing a Delta Plus kitchen faucet leaking promptly not only saves water and money but also prevents potential water damage to your kitchen.
