Disassembling and Understanding the M242 Bushmaster Bolt Assembly
The M242 Bushmaster is a widely used 25mm chain gun known for its reliability and effectiveness in various military applications. Understanding the intricate components of this weapon, particularly the bolt assembly, is crucial for maintenance, troubleshooting, and overall operational readiness. This article provides a comprehensive overview of the bolt assembly from a M242 Bushmaster, focusing on the disassembly process, key components, and their functions.
Introduction to the M242 Bushmaster
The M242 Bushmaster, designed and manufactured by Northrop Grumman (formerly McDonnell Douglas), is a chain-driven autocannon that has seen service across numerous platforms, including the M2 Bradley Fighting Vehicle, various naval vessels, and land-based air defense systems. Its versatility and high rate of fire make it a formidable weapon. Proper maintenance and understanding of its components are essential for maintaining its reliability.
The Importance of the Bolt Assembly
The bolt assembly is a critical component of the M242 Bushmaster, responsible for chambering rounds, locking the breech, and initiating the firing sequence. Any malfunction within the bolt assembly can lead to weapon failure, making its proper maintenance and understanding paramount. Regular inspection and cleaning of the bolt assembly are vital for ensuring optimal performance and longevity of the weapon system.
Disassembling the M242 Bushmaster Bolt Assembly: A Step-by-Step Guide
Disclaimer: Disassembling and handling firearms components should only be performed by qualified personnel who have received proper training and adhere to all safety regulations. This guide is for informational purposes only and should not be used as a substitute for professional instruction.
Safety Precautions
Before beginning any disassembly procedure, ensure the weapon is completely unloaded and safe. Wear appropriate eye protection and gloves to prevent injury. Work in a clean, well-lit area to avoid losing small parts.
Tools Required
The following tools are typically required for disassembling the bolt assembly from a M242 Bushmaster:
- Screwdrivers (various sizes)
- Punches (various sizes)
- Hammer
- Wrench set
- Cleaning supplies (solvent, brushes, and cloths)
- Assembly/Disassembly manual for the M242 Bushmaster
Step-by-Step Disassembly Process
- Initial Inspection: Before disassembly, visually inspect the bolt assembly for any obvious signs of damage, wear, or corrosion. Note any irregularities that may require further attention.
- Removal from the Weapon: Safely remove the bolt assembly from the M242 Bushmaster according to the weapon’s technical manual. Ensure the weapon is properly secured before proceeding.
- Stripping the Bolt:
- Firing Pin Retaining Pin Removal: Using a punch, carefully drive out the firing pin retaining pin. This will allow access to the firing pin.
- Firing Pin Removal: Once the retaining pin is removed, carefully extract the firing pin from the bolt assembly. Note the orientation of the firing pin for reassembly.
- Extractor Removal: The extractor is responsible for removing spent casings from the chamber. Use a punch or specialized tool to depress the extractor plunger and remove the extractor. Be cautious, as the plunger is spring-loaded.
- Ejector Removal: The ejector works in conjunction with the extractor to expel spent casings. Similar to the extractor, use a punch to depress the ejector plunger and remove the ejector. Again, be mindful of the spring pressure.
- Cam Pin Removal: Locate and remove the cam pin that secures the bolt carrier. This pin allows the bolt to rotate and lock into the breech.
- Bolt Carrier Disassembly: Separate the bolt from the bolt carrier. Inspect the carrier for wear and damage.
- Cleaning and Inspection: After disassembling the bolt assembly, thoroughly clean all components using appropriate solvents and brushes. Inspect each part for cracks, wear, and corrosion. Pay close attention to the firing pin, extractor, and ejector, as these components are subject to significant stress during operation.
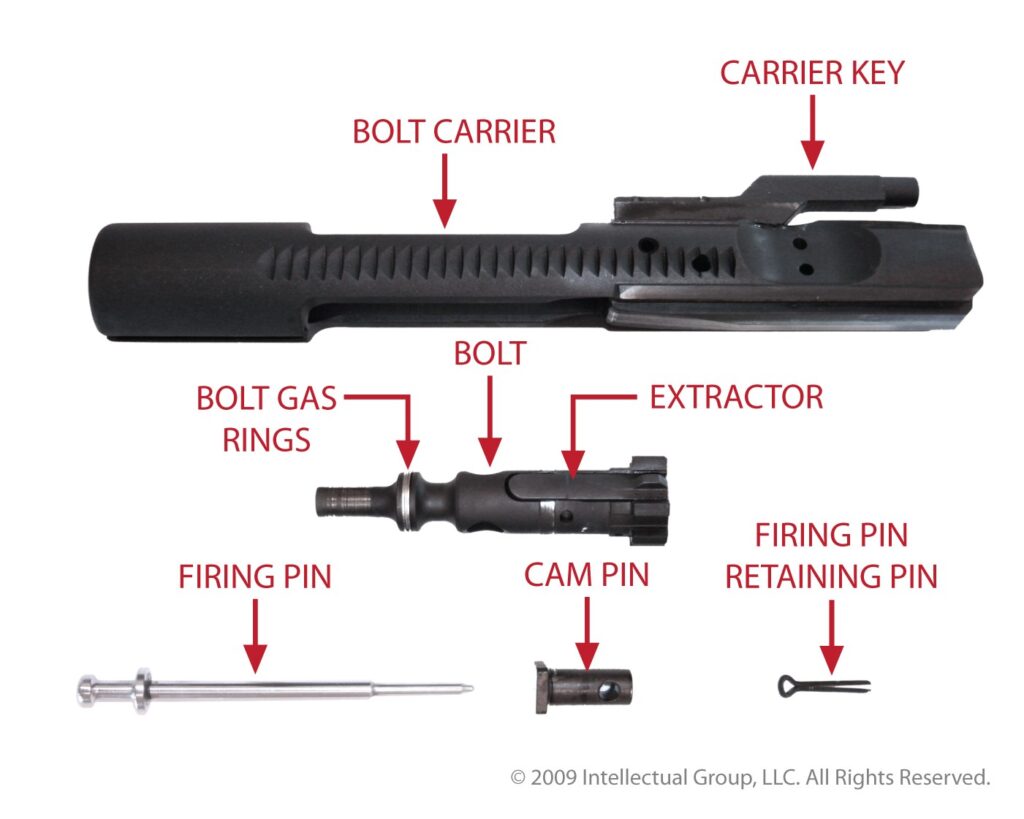
Key Components of the M242 Bushmaster Bolt Assembly
Understanding the function of each component within the bolt assembly is crucial for effective maintenance and troubleshooting.
- Bolt: The primary component responsible for chambering rounds and locking the breech. It must be robust and precisely machined to ensure proper function.
- Bolt Carrier: Houses the bolt and provides the necessary movement for cycling the weapon. The bolt carrier interfaces with the operating mechanism of the M242 Bushmaster.
- Firing Pin: Strikes the primer of the cartridge, initiating the firing sequence. The firing pin must be free from damage and properly aligned to ensure reliable ignition.
- Firing Pin Retaining Pin: Secures the firing pin within the bolt assembly. It must be properly installed to prevent accidental firing.
- Extractor: Grips the rim of the cartridge case and extracts it from the chamber after firing. The extractor is a critical component for reliable cycling.
- Ejector: Expels the spent cartridge case from the weapon after it has been extracted. The ejector works in conjunction with the extractor to ensure proper ejection.
- Cam Pin: Controls the rotation of the bolt, allowing it to lock and unlock from the breech. The cam pin is essential for proper cycling and locking.
Common Issues and Troubleshooting
Several common issues can arise with the bolt assembly from a M242 Bushmaster. These include:
- Failure to Fire: This can be caused by a broken or damaged firing pin, a dirty firing pin channel, or a faulty primer.
- Failure to Extract: This is often due to a worn or broken extractor, a dirty chamber, or damaged cartridge cases.
- Failure to Eject: A worn or broken ejector, a dirty ejector channel, or a weak ejector spring can cause this issue.
- Bolt Not Locking: This can be caused by a worn cam pin, a damaged bolt, or excessive fouling within the bolt assembly.
Troubleshooting these issues typically involves a thorough inspection of the bolt assembly, cleaning all components, and replacing any worn or damaged parts. Regular maintenance and lubrication are essential for preventing these problems.
Reassembling the M242 Bushmaster Bolt Assembly
Reassembly is essentially the reverse of the disassembly process. Ensure all components are clean and properly lubricated before reassembling. Follow the steps below:
- Reassembling the Bolt Carrier: Insert the bolt into the bolt carrier. Ensure it moves freely and properly engages with the cam pin slot.
- Installing the Cam Pin: Insert the cam pin into the bolt carrier, securing the bolt. Ensure the cam pin is properly seated and aligned.
- Installing the Ejector: Depress the ejector plunger and insert the ejector into its slot. Ensure the ejector spring is properly positioned.
- Installing the Extractor: Depress the extractor plunger and insert the extractor into its slot. Ensure the extractor spring is properly positioned.
- Installing the Firing Pin: Carefully insert the firing pin into the bolt assembly. Ensure it is properly aligned.
- Installing the Firing Pin Retaining Pin: Insert the firing pin retaining pin, securing the firing pin. Ensure the pin is properly seated and aligned.
After reassembly, function-check the bolt assembly to ensure all components are working correctly. Verify that the firing pin moves freely, the extractor and ejector function properly, and the bolt locks and unlocks smoothly.
Maintenance and Care
Regular maintenance is crucial for prolonging the life of the bolt assembly from a M242 Bushmaster and ensuring its reliable operation. Follow these guidelines:
- Regular Cleaning: Clean the bolt assembly after each use or at regular intervals, depending on the operating environment. Use appropriate solvents and brushes to remove fouling and debris.
- Lubrication: Lubricate all moving parts with a high-quality firearm lubricant. Pay particular attention to the firing pin, extractor, and ejector.
- Inspection: Regularly inspect the bolt assembly for signs of wear, damage, or corrosion. Replace any worn or damaged parts immediately.
- Proper Storage: Store the bolt assembly in a clean, dry environment to prevent corrosion.
Conclusion
Understanding the bolt assembly from a M242 Bushmaster, including its disassembly, components, and maintenance, is essential for ensuring the weapon’s reliable operation and longevity. By following the guidelines outlined in this article, qualified personnel can effectively maintain and troubleshoot the bolt assembly, contributing to the overall readiness and effectiveness of the M242 Bushmaster weapon system. The M242’s bolt assembly is a complex piece of engineering, and its proper care is paramount. Remember to always consult the official technical manuals and seek professional training before performing any maintenance or repairs on firearms.
[See also: M242 Bushmaster Maintenance Procedures]
[See also: Troubleshooting Common M242 Bushmaster Problems]
[See also: M242 Bushmaster Ammunition Types]
