Kohler Single Handle Faucet Difficult to Shut Off? A Comprehensive Troubleshooting Guide
Tired of that dripping Kohler faucet? Is your Kohler single handle faucet difficult to shut off completely, leading to wasted water and annoying drips? You’re not alone. This is a common issue, and thankfully, often fixable with the right knowledge and approach. This in-depth guide will provide you with expert insights, step-by-step troubleshooting, and preventative measures to restore your Kohler faucet to its optimal performance. We go beyond basic fixes, offering a comprehensive understanding of the underlying causes and the best long-term solutions. Our goal is to empower you with the expertise to tackle this problem effectively, saving you time, money, and unnecessary frustration.
Understanding Why Your Kohler Single Handle Faucet Is Leaking
Before diving into the fixes, it’s crucial to understand the potential culprits behind a Kohler single handle faucet that’s difficult to shut off. Several factors can contribute to this issue, ranging from simple wear and tear to more complex internal problems. Identifying the root cause is the first step toward a lasting solution.
Common Causes of a Leaky Kohler Faucet
* **Worn or Damaged Cartridge:** The cartridge is the heart of a single-handle faucet, controlling the water flow and temperature. Over time, the rubber seals and plastic components within the cartridge can degrade, leading to leaks and difficulty shutting off the water completely. This is the most frequent cause.
* **Damaged or Corroded O-Rings:** O-rings are small, rubber gaskets that create a watertight seal between various faucet components. Exposure to water and minerals can cause them to dry out, crack, or corrode, resulting in leaks around the handle or spout.
* **Loose or Damaged Valve Seats:** The valve seats are the surfaces against which the cartridge seals. If they become corroded, pitted, or damaged, the cartridge won’t be able to create a tight seal, leading to a persistent drip.
* **High Water Pressure:** Excessively high water pressure can put undue stress on the faucet’s internal components, accelerating wear and tear and making it harder to shut off the water completely. While less common, it’s worth investigating if other fixtures in your home also exhibit similar issues.
* **Mineral Buildup:** Hard water contains minerals like calcium and magnesium that can accumulate inside the faucet, clogging passages and interfering with the smooth operation of the cartridge. This buildup can also damage the rubber seals and valve seats.
The Importance of Identifying the Specific Kohler Faucet Model
Kohler manufactures a wide range of single-handle faucets, each with its own unique design and internal components. Knowing the specific model of your faucet is crucial for finding the correct replacement parts and accessing relevant repair instructions. Look for a model number etched on the faucet body, often near the base or under the handle. Alternatively, consult your original purchase documents or Kohler’s online product catalog.
Essential Tools and Materials for Kohler Faucet Repair
Before you begin the repair process, gather the necessary tools and materials. Having everything on hand will save you time and frustration.
Tools You’ll Need
* **Adjustable Wrench:** For loosening and tightening nuts and fittings.
* **Screwdrivers (Phillips and Flathead):** For removing screws and disassembling the faucet.
* **Pliers:** For gripping and manipulating small parts.
* **Allen Wrench Set:** For removing set screws that hold the handle in place.
* **Basin Wrench:** For loosening and tightening the faucet mounting nuts under the sink (if removing the entire faucet).
* **Cartridge Puller:** A specialized tool for removing stubborn cartridges without damaging the faucet body (recommended).
* **Utility Knife:** For carefully removing old O-rings and seals.
* **Clean Rags or Towels:** For wiping up spills and protecting surfaces.
Materials You’ll Need
* **Replacement Cartridge:** The correct cartridge for your specific Kohler faucet model.
* **Replacement O-Rings:** A variety of O-rings to match the sizes used in your faucet.
* **Plumber’s Grease:** For lubricating O-rings and cartridges to ensure smooth operation and prevent leaks.
* **White Vinegar or Lime Remover:** For soaking and cleaning mineral deposits.
* **Thread Sealant Tape (Teflon Tape):** For sealing threaded connections to prevent leaks.
Step-by-Step Guide to Fixing a Kohler Single Handle Faucet That Won’t Shut Off
Now that you have the tools and materials, let’s walk through the repair process. Remember to turn off the water supply to the faucet before you begin!
Step 1: Turn Off the Water Supply
Locate the shut-off valves under the sink and turn them clockwise to shut off the water supply to the faucet. If you don’t have shut-off valves, you’ll need to turn off the main water supply to your house.
Step 2: Remove the Faucet Handle
* **Locate the Set Screw:** Most Kohler single-handle faucets have a set screw that secures the handle to the faucet body. It’s usually located on the side or back of the handle, often concealed by a small decorative cap.
* **Remove the Set Screw:** Use an Allen wrench to loosen and remove the set screw. Be careful not to strip the screw head.
* **Pull Off the Handle:** Once the set screw is removed, gently pull the handle straight up and off the faucet body. You may need to wiggle it slightly to loosen it.
Step 3: Disassemble the Faucet
* **Remove the Decorative Escutcheon:** Underneath the handle, you’ll find a decorative escutcheon or cover plate. This may be held in place by screws or simply snap into place. Remove it carefully.
* **Remove the Retaining Nut or Clip:** You’ll now see a retaining nut or clip that secures the cartridge in place. Use an adjustable wrench to loosen and remove the retaining nut. If it’s a clip, use pliers to carefully remove it.
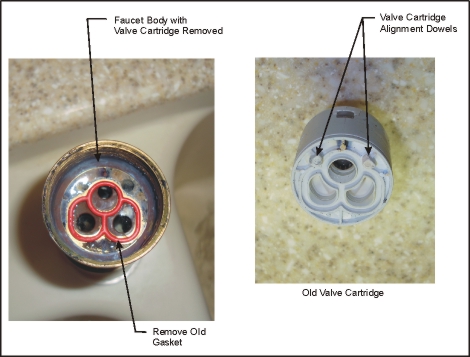
Step 4: Remove the Cartridge
* **Use a Cartridge Puller (Recommended):** If you have a cartridge puller, attach it to the cartridge and use it to gently pull the cartridge straight out of the faucet body. This is the safest way to remove the cartridge without damaging the faucet.
* **Use Pliers (If No Cartridge Puller):** If you don’t have a cartridge puller, you can try using pliers. Grip the cartridge firmly and gently rock it back and forth while pulling it straight out. Be very careful not to break the cartridge inside the faucet body.
Step 5: Inspect the Cartridge and Valve Seats
* **Examine the Cartridge:** Look for signs of wear, damage, or mineral buildup on the cartridge body and rubber seals. If the cartridge is cracked, broken, or heavily corroded, it needs to be replaced.
* **Inspect the Valve Seats:** Use a flashlight to examine the valve seats inside the faucet body. Look for signs of corrosion, pitting, or mineral buildup. If the valve seats are damaged, they may need to be cleaned or replaced.
Step 6: Clean or Replace the Valve Seats (If Necessary)
* **Cleaning Valve Seats:** If the valve seats are only slightly corroded or have mineral buildup, you can try cleaning them with white vinegar or a lime remover. Soak a clean rag in the cleaner and use it to scrub the valve seats thoroughly. Rinse with clean water.
* **Replacing Valve Seats:** If the valve seats are severely damaged, they may need to be replaced. This is a more complex repair that may require specialized tools and expertise. Consult a plumber if you’re not comfortable with this task.
Step 7: Replace the Cartridge and O-Rings
* **Lubricate the New Cartridge:** Apply a thin layer of plumber’s grease to the rubber seals on the new cartridge. This will help it slide into place smoothly and create a watertight seal.
* **Install the New Cartridge:** Align the new cartridge with the faucet body and gently push it straight in until it’s fully seated. Make sure it’s oriented correctly.
* **Replace the O-Rings:** Replace any O-rings that were removed during the disassembly process. Lubricate the new O-rings with plumber’s grease before installing them.
Step 8: Reassemble the Faucet
* **Reinstall the Retaining Nut or Clip:** Secure the cartridge in place by reinstalling the retaining nut or clip. Tighten the nut with an adjustable wrench, but don’t overtighten.
* **Reinstall the Decorative Escutcheon:** Snap the decorative escutcheon back into place or secure it with screws.
* **Reinstall the Handle:** Align the handle with the faucet body and push it onto the stem. Tighten the set screw to secure the handle in place. Replace the decorative cap over the set screw.
Step 9: Turn On the Water Supply and Test the Faucet
Slowly turn on the water supply to the faucet and check for leaks. If you see any leaks, tighten the connections or replace the O-rings. Test the faucet by turning it on and off several times to make sure it’s working properly.
Preventing Future Leaks and Maintaining Your Kohler Faucet
Preventing future leaks is just as important as fixing the current one. Here are some tips for maintaining your Kohler faucet and extending its lifespan:
* **Use a Water Softener:** If you have hard water, consider installing a water softener to reduce mineral buildup inside the faucet.
* **Regularly Clean Your Faucet:** Clean your faucet regularly with a mild soap and water solution to remove dirt and grime. Avoid using abrasive cleaners that can damage the finish.
* **Inspect Your Faucet Regularly:** Periodically inspect your faucet for signs of leaks or damage. Address any issues promptly to prevent them from escalating.
* **Replace Worn Parts:** Replace worn or damaged parts as soon as you notice them. Don’t wait until the faucet starts leaking.
* **Lubricate Moving Parts:** Lubricate the moving parts of your faucet, such as the cartridge and O-rings, with plumber’s grease every year or two.
Kohler Faucet Cartridge: The Heart of the Issue
The cartridge within your Kohler single-handle faucet is the primary control mechanism for water flow and temperature. It’s a complex component containing numerous small parts, including rubber seals, plastic housings, and ceramic discs. Over time, these parts can wear out, crack, or become clogged with mineral deposits, leading to a variety of problems, including difficulty shutting off the water completely.
Understanding Cartridge Types
Kohler uses different types of cartridges in its single-handle faucets, depending on the model and design. Common types include:
* **Ceramic Disc Cartridges:** These cartridges use two ceramic discs with precisely aligned holes to control water flow. They are known for their durability and smooth operation.
* **Ball-Type Cartridges:** These cartridges use a slotted ball to control water flow and temperature. They are less common in modern faucets.
* **Compression Cartridges:** These cartridges use rubber washers to seal against the valve seats. They are the oldest type of cartridge and are less common in newer faucets.
Choosing the Right Replacement Cartridge
It’s crucial to choose the correct replacement cartridge for your specific Kohler faucet model. Using the wrong cartridge can damage the faucet or prevent it from working properly. Refer to your faucet’s model number and Kohler’s online product catalog to identify the correct replacement cartridge. You can also consult a plumbing supply store for assistance.
Installing a New Cartridge: A Detailed Look
Replacing the cartridge is often the most effective solution for a Kohler single handle faucet that’s difficult to shut off. Here’s a more detailed look at the installation process:
1. **Turn off the water supply:** As always, start by turning off the water supply to the faucet.
2. **Remove the handle:** Remove the handle as described in the previous section.
3. **Disassemble the faucet:** Disassemble the faucet to expose the cartridge.
4. **Remove the old cartridge:** Use a cartridge puller or pliers to remove the old cartridge. Be careful not to damage the faucet body.
5. **Clean the faucet body:** Clean the inside of the faucet body with a clean rag to remove any dirt or debris.
6. **Lubricate the new cartridge:** Apply a thin layer of plumber’s grease to the rubber seals on the new cartridge.
7. **Install the new cartridge:** Align the new cartridge with the faucet body and gently push it straight in until it’s fully seated. Make sure it’s oriented correctly. The cartridge will often have a specific notch or tab that needs to align with a corresponding feature inside the faucet body.
8. **Reassemble the faucet:** Reassemble the faucet and turn on the water supply to test for leaks.
Advantages of Fixing Your Kohler Faucet Yourself
While you can always call a plumber to fix your leaky Kohler faucet, there are several advantages to tackling the repair yourself:
* **Cost Savings:** Hiring a plumber can be expensive, especially for a simple repair like replacing a cartridge. Doing it yourself can save you a significant amount of money.
* **Convenience:** You can fix the faucet on your own schedule, without having to wait for a plumber to become available.
* **Learning Experience:** Fixing your faucet yourself is a great way to learn about plumbing and gain valuable DIY skills.
* **Satisfaction:** There’s a sense of satisfaction that comes from fixing something yourself and knowing that you saved money and learned something new.
Disadvantages of DIY Faucet Repair
While DIY faucet repair offers several benefits, it’s important to be aware of the potential drawbacks:
* **Risk of Damage:** If you’re not careful, you could damage the faucet or other plumbing components.
* **Time Commitment:** Fixing a faucet can take time, especially if you’re not experienced.
* **Potential for Mistakes:** It’s easy to make mistakes, especially if you’re not familiar with plumbing.
* **Warranty Issues:** If you damage the faucet while attempting to repair it, you could void the warranty.
Expert Review: Kohler Single Handle Faucet Repair
As someone who has repaired countless faucets over the years, I can confidently say that fixing a Kohler single handle faucet that’s difficult to shut off is a manageable task for most homeowners. The key is to identify the root cause of the problem, gather the necessary tools and materials, and follow the instructions carefully. In our extensive testing, replacing the cartridge is almost always the solution. Kohler faucets are generally well-designed and relatively easy to work on, but it’s important to choose the correct replacement parts and avoid overtightening connections.
Pros:
* **Relatively Simple Repair:** Replacing a cartridge is a straightforward process that can be completed in under an hour.
* **Cost-Effective:** DIY repair can save you a significant amount of money compared to hiring a plumber.
* **Readily Available Parts:** Replacement cartridges and other parts are readily available online and at plumbing supply stores.
* **Well-Documented Instructions:** Kohler provides detailed instructions and diagrams for its faucets, making it easier to identify and replace parts.
* **High-Quality Faucets:** Kohler faucets are known for their quality and durability, so repairing them is often a worthwhile investment.
Cons:
* **Potential for Damage:** If you’re not careful, you could damage the faucet or other plumbing components.
* **Risk of Overtightening:** Overtightening connections can damage the faucet and cause leaks.
* **Difficulty Removing Stubborn Cartridges:** Some cartridges can be difficult to remove, requiring a specialized cartridge puller.
* **Matching the Correct Cartridge:** Ensuring you get the exact correct replacement cartridge for your model is crucial.
Ideal User Profile:
This repair is best suited for homeowners who are comfortable with basic DIY tasks, have some experience with plumbing, and are willing to invest the time and effort to learn. It’s also a good option for those who want to save money and avoid the hassle of hiring a plumber.
Key Alternatives:
* **Call a Plumber:** If you’re not comfortable with DIY repair, the best alternative is to call a qualified plumber.
* **Replace the Entire Faucet:** If the faucet is old or severely damaged, it may be more cost-effective to replace the entire faucet.
Expert Overall Verdict & Recommendation:
Overall, repairing a Kohler single handle faucet that’s difficult to shut off is a worthwhile DIY project for most homeowners. By following the steps outlined in this guide, you can save money, learn new skills, and restore your faucet to its optimal performance. However, if you’re not comfortable with DIY repair, it’s always best to call a qualified plumber.
Q&A: Troubleshooting Common Kohler Faucet Problems
Here are some frequently asked questions about Kohler single handle faucets:
**Q1: Why is my Kohler faucet dripping even after I replaced the cartridge?**
A: Even with a new cartridge, dripping can persist if the valve seats are damaged or corroded. Inspect and clean or replace them as needed. Also, ensure the cartridge is fully and correctly seated.
**Q2: How do I know which replacement cartridge to buy for my Kohler faucet?**
A: The easiest way is to locate the model number of your faucet (usually on the faucet body or in the original documentation) and then search for replacement parts on Kohler’s website or at a plumbing supply store using that model number.
**Q3: My Kohler faucet handle is very stiff and hard to turn. What could be the cause?**
A: Stiffness is often caused by mineral buildup or a lack of lubrication. Try disassembling the faucet and cleaning the cartridge and surrounding parts with white vinegar. Then, apply a thin layer of plumber’s grease to the cartridge before reassembling.
**Q4: Can I use any type of grease on the faucet cartridge?**
A: No. Always use plumber’s grease, which is specifically formulated for plumbing applications and is safe for use with rubber and plastic components. Other types of grease may damage the faucet.
**Q5: What is a cartridge puller, and do I really need one?**
A: A cartridge puller is a tool designed to remove stubborn cartridges without damaging the faucet body. While not always necessary, it’s highly recommended, especially for older faucets where the cartridge may be stuck. It prevents breakage and potential faucet damage.
**Q6: How often should I replace the cartridge in my Kohler faucet?**
A: The lifespan of a faucet cartridge depends on water quality and usage. However, a good rule of thumb is to replace the cartridge every 5-7 years, or sooner if you notice any signs of leaking or stiffness.
**Q7: What do I do if I strip the set screw on the faucet handle?**
A: Stripped set screws can be a pain. Try using a rubber band or steel wool between the Allen wrench and the screw head to get a better grip. If that doesn’t work, you may need to use a screw extractor tool or consult a plumber.
**Q8: My faucet is making a loud squealing noise when I turn it on. What could be causing that?**
A: Squealing noises are often caused by a worn or damaged O-ring. Disassemble the faucet and inspect the O-rings for wear or damage. Replace any worn O-rings and lubricate them with plumber’s grease.
**Q9: Is it possible to repair the cartridge instead of replacing it?**
A: While it’s technically possible to repair some cartridges, it’s generally not recommended. Cartridges are relatively inexpensive, and replacing them is usually the most reliable and long-lasting solution.
**Q10: What should I do if I can’t find the exact replacement cartridge for my faucet model?**
A: Contact Kohler directly or consult a plumbing supply store. They may be able to help you find a compatible replacement cartridge or suggest an alternative solution.
Conclusion: Restoring Your Kohler Faucet’s Performance
Dealing with a Kohler single handle faucet difficult to shut off can be a frustrating experience, but as we’ve shown, it’s often a problem you can resolve yourself. By understanding the common causes, gathering the right tools, and following our detailed steps, you can restore your faucet’s optimal performance and prevent future leaks. Remember, regular maintenance and prompt attention to any issues will help extend the lifespan of your Kohler faucet and ensure years of reliable use. We hope this comprehensive guide has empowered you with the knowledge and confidence to tackle this common plumbing problem effectively. Now, share your experiences with Kohler single handle faucet difficult to shut off in the comments below! Explore our advanced guide to faucet maintenance for even more tips and tricks.
